Chili Beef (Chunky Style)
Ingredients
Equipment
Method
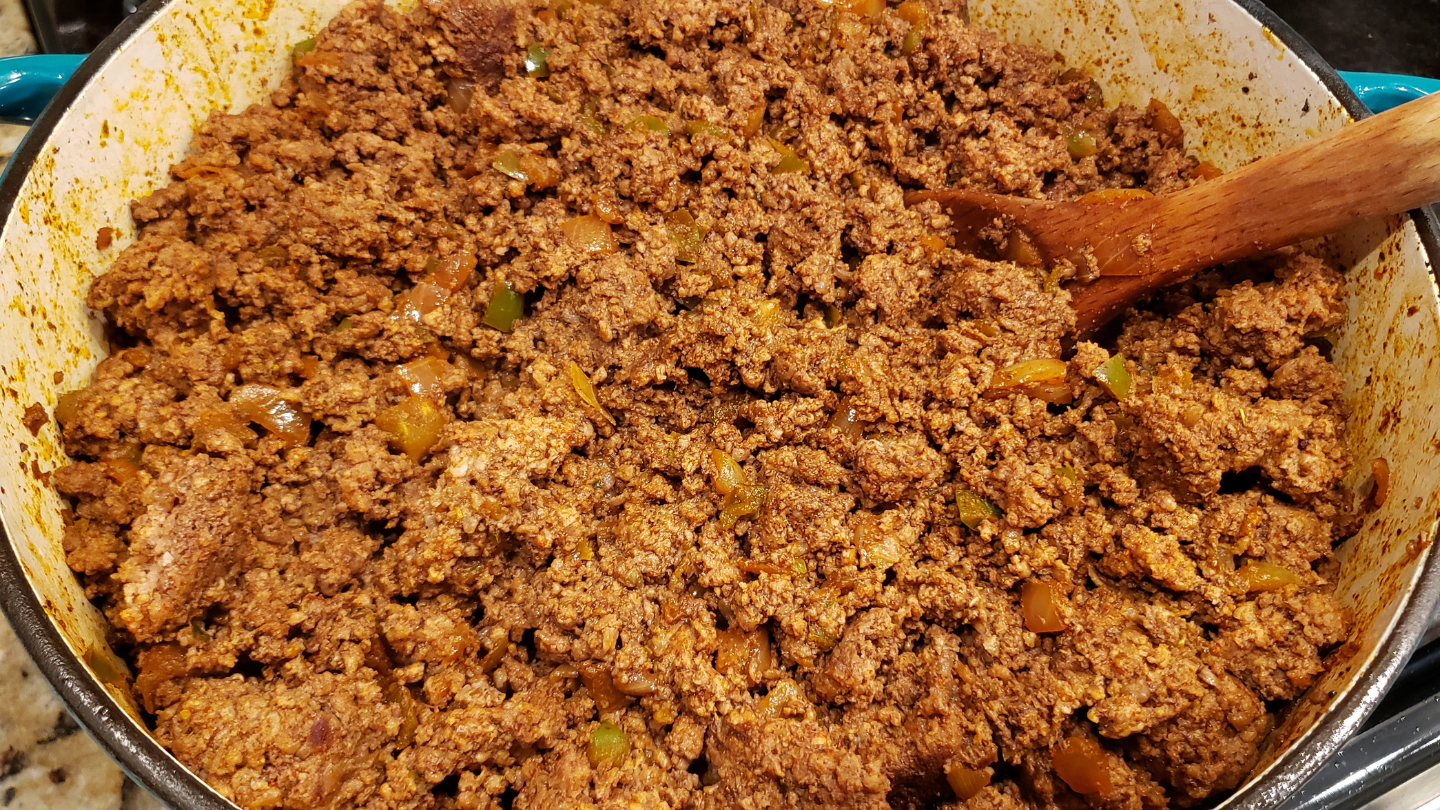
- Heat a large cast iron skillet or Dutch oven over medium heat.
- Add beef fat.
- Add the onions and bell peppers.
- Sauté for 8-10 minutes, stirring occasionally, until translucent and beginning to caramelize.
- Add the entire 5 lb of ground beef.
- Spread it in a flat even layer like a giant hamburger patty.
- Let it cook undisturbed for 5-7 minutes until the edges lose their pink color and start to brown.
- Break the beef into large 2-3 inch chunks and flip to cook the other side.
- Continue cooking and turning chunks until all beef is thoroughly browned, about 10-12 more minutes.
- Add all seasonings: paprika, salt, cumin, oregano, granulated garlic, granulated onion, and pepper.
- Stir to coat the beef and vegetables.
- Cook for 1-2 minutes to toast the spices.
- Add the water and stir to combine.
- Reduce heat to low.
- Simmer uncovered for 15-20 minutes, stirring occasionally, until most liquid has evaporated but the meat remains moist.
Notes
Tried this recipe?
Let us know how it was!Why Batch Chili Beef
It's Tuesday night. You're tired, the family's hungry, and the thought of starting dinner from scratch feels insurmountable. You don't want takeout again, but you also don't have 90 minutes to brown five pounds of ground beef and dial in the seasoning. This is the exact moment batch chili beef justifies its existence. You pull a vacuum-sealed portion from the freezer, drop it in simmering water or microwave it, and you've got perfectly seasoned, restaurant-quality chili beef ready while rice cooks. That Sunday afternoon you spent cooking? It just bought you back your Tuesday night sanity.
This isn't meal prep in the Instagram sense. You're not packing identical lunch containers. You're building infrastructure-the kind of foundational component that professional kitchens prep in advance because no restaurant could survive cooking everything to order from raw ingredients. You're stocking a walk-in freezer at home, and this chunky, well-seasoned ground beef base becomes the starting point for a dozen different dinners over the next two months.
The Restaurant Method
In commercial kitchens, nobody's browning ground beef to order during dinner service. The beef gets cooked in large batches during prep hours, seasoned properly, portioned into storage containers, and held until service. When an order comes in, you're reheating and assembling, not starting from scratch. This recipe adapts that exact system for home use-you're the prep cook on Sunday and the line cook on Tuesday.
What Makes This Worth the Time
Here's what I love about chunky chili: cooking the ground beef like a chopped burger in the pan gives you those big, chunky pieces of cooked beef instead of fine crumbles. You get a very meaty texture in the final chili-substantial bites that make the dish feel hearty and satisfying. Ground beef benefits enormously from batch preparation because the tedious part isn't the cooking-it's the seasoning, tasting, and adjusting. When you're making a single pound, you're guessing at measurements and hoping it works. When you're making five pounds, you can properly develop the seasoning, taste as you go, and dial in the exact flavor profile you want. Then that perfect seasoning ratio gets locked into every portion you freeze.
Cooking larger quantities of ground beef allows you to properly render the fat, develop fond on the bottom of the pan, and deglaze with water to create a rich, cohesive mixture instead of dry crumbles. The frozen vegetable shortcut-using pre-chopped onions and peppers-eliminates the worst part of the prep work without sacrificing quality. And here's the best part: this recipe works for burrito bowls, served over rice, or any stuffed Mexican recipe where you need that chunky beef texture. You're not locked into one use case.
Time Investment & Meal Yield
Here's the honest math on what you're building:
What You're Actually Building
- Active prep: 15 minutes (dump frozen vegetables, measure spices, gather supplies)
- Active cooking: 35 minutes (browning beef to get those chunky pieces, building flavor, simmering)
- Portioning & sealing: 15 minutes (cool slightly, portion into bags, label, seal)
- Result: 4 portions of 1.5 pounds each = 8-12 complete dinner bases over the next 2-3 months
The Real-World Timeline
Those portions don't get eaten in one week. You pull one this Tuesday for chili. Another next week becomes taco filling. Two weeks later it's loaded baked potatoes. A month from now it's stuffed peppers. The 65-minute investment on one Sunday spreads across three months of dinners. That's the compound interest of batch cooking-you're not just saving time on one meal, you're eliminating the exhausting "what's for dinner" decision and cooking process a dozen times over.
Storage & The Freezer Reality
Let's address the elephant in the room: "But won't it taste freezer-burned after months?" No. Not even close. And here's why your concerns are based on outdated information about freezer storage.
Why Vacuum Sealing Changes Everything
- Flat storage: Vacuum-sealed bags stack like files in a drawer-no hunting through round containers or playing freezer Tetris
- Fast thawing: Flat bags thaw overnight in the fridge, or you can quick-reheat straight from frozen in simmering water
- Zero freezer burn: Properly vacuum sealed, this has a 3-6 month freezer life and tastes as fresh on month three as it did on day one
- Professional standard: Commercial kitchens use vacuum sealing for prep storage because it works-you're using the same equipment and methods
The Commercial Food Comparison
That frozen pizza in your freezer? It was manufactured weeks ago, sat in a distributor's warehouse freezer, moved to the grocery store's freezer, and is expected to sit in your freezer for months. The package says "best by" six months from now, and nobody questions it. Your vacuum-sealed chili beef follows the exact same preservation principles but with better ingredients and no preservatives. Ground beef from the grocery store "fresh" case was processed days ago and has been sitting in refrigeration losing quality. Your batch component, frozen within two hours of cooking, is objectively fresher than most of what's marketed as fresh in the prepared foods section.
Cost Breakdown
Let's calculate what this batch actually costs you versus buying equivalent prepared meals or eating out.
Batch Cost Calculation
Ingredients breakdown:
- Ground beef (80/20): 5 lbs × $3.99/lb = $19.95
- Frozen chopped onions: 16 oz × $0.15/oz = $2.40
- Frozen chopped bell peppers: 16 oz × $0.18/oz = $2.88
- Beef fat or oil: 4 oz = $1.50
- Spices (paprika, cumin, oregano, salt, garlic, onion, pepper): $2.50
- Total batch cost: $29.23
- Portions created: 4 portions (1.5 lbs each, serves 3-4 per portion)
- Cost per portion: $29.23 ÷ 4 = $7.31
The Savings Add Up
Per-meal comparison:
- Homemade portion (serves 3-4): $7.31
- Chipotle burrito bowls (3): $27.00
- Taco Bell equivalent (feeds 3-4): $18.00
- Local restaurant chili or taco entrees (3): $36.00
- Savings per meal (conservative): $36.00 - $7.31 = $28.69 vs. restaurant, $10.69 vs. fast food
- Total batch savings: $28.69 × 4 = $114.76 if you replaced restaurant meals, or $10.69 × 4 = $42.76 vs. fast food
Even accounting for your time, rice, beans, tortillas, and whatever else you serve alongside, you're looking at complete dinners for $10-12 that would cost $30-40 dining out. The batch method turns premium ground beef into a cheaper-per-meal option than fast food while delivering significantly better quality and nutrition.
Using This Component
This isn't a one-trick recipe. Chunky, well-seasoned chili beef becomes the foundation for at least a dozen different meals without feeling repetitive.
Quick Assembly Meals
- Classic Chili: Thaw overnight, simmer with canned tomatoes and beans for 15 minutes, serve with cornbread-total time 20 minutes
- Taco Night: Reheat from frozen in a skillet with a splash of water, serve with tortillas and toppings-15 minutes to table
- Burrito Bowls: Reheat while rice cooks, layer over cilantro-lime rice with beans, salsa, cheese-restaurant quality at home
- Chili Mac: Reheat while pasta boils, combine with cooked elbow macaroni and shredded cheese-20 minutes including boiling water
- Stuffed Peppers: Thaw, mix with cooked rice, stuff into halved bell peppers, bake 30 minutes-minimal active work
- Loaded Baked Potatoes: Bake potatoes, reheat chili beef, top with cheese and sour cream-easy weeknight comfort food
- Sloppy Joes: Thaw, simmer with ketchup and brown sugar for 10 minutes, serve on buns-kids love it
This is how you stock a professional kitchen at home. You're not cooking twelve separate dinners-you're cooking once with focus and intention, then reheating and assembling when you're tired and hungry. The vacuum-sealed portions in your freezer represent decisions you don't have to make, prep work you don't have to do, and Tuesday nights you get to reclaim. That's the entire point of batch components: invest the time once, solve the dinner problem a dozen times over, save hundreds of dollars, and eat better than you would ordering takeout.
Recipe
Chili Beef (Chunky Style)
Ingredients
Equipment
Method
- Heat a large cast iron skillet or Dutch oven over medium heat.
- Add beef fat.
- Add the onions and bell peppers.
- Sauté for 8-10 minutes, stirring occasionally, until translucent and beginning to caramelize.
- Add the entire 5 lb of ground beef.
- Spread it in a flat even layer like a giant hamburger patty.
- Let it cook undisturbed for 5-7 minutes until the edges lose their pink color and start to brown.
- Break the beef into large 2-3 inch chunks and flip to cook the other side.
- Continue cooking and turning chunks until all beef is thoroughly browned, about 10-12 more minutes.
- Add all seasonings: paprika, salt, cumin, oregano, granulated garlic, granulated onion, and pepper.
- Stir to coat the beef and vegetables.
- Cook for 1-2 minutes to toast the spices.
- Add the water and stir to combine.
- Reduce heat to low.
- Simmer uncovered for 15-20 minutes, stirring occasionally, until most liquid has evaporated but the meat remains moist.


Was this helpful?
You must be logged in to post a comment.