Hot Dog Chili (Bean less)
Equipment
- Cast iron skillet
- Saucepan
- Wooden spoon
- Can Opener
Ingredients
Hot Dog Chili
- 1 ¼ lb Restaurant-Style Taco Meat 1 batch, thawed
- 1 can Tomato Sauce 14.5 oz
- ½ cup Water optional, for desired consistency
Instructions
- Heat a cast iron skillet or saucepan over medium heat.
- Add the taco meat, break apart, and spread evenly.
- Add the tomato sauce and stir to combine.
- Add the water if you want thinner chili for easier spooning onto hot dogs, or skip it for thicker chili that stays on the dog.
- Reduce heat to low and simmer for 8-10 minutes, stirring occasionally, until heated through and the flavors have melded.
- Use immediately on hot dogs, hamburgers, or chili cheese fries.
- Refrigerate leftovers for up to 3 days.
- Do not freeze the finished chili.
Notes
Why This Assembly Meal Works
You're exhausted, it's Tuesday night, and everyone needs dinner now. Or it's game day and friends are coming over in 20 minutes. Hot dog chili sounds perfect-that classic comfort food that feels indulgent without breaking the bank. But traditional recipes require browning ground beef, carefully layering spices, simmering for the right texture. That's 45 minutes of active cooking you don't have tonight.
Here's the reality: you're not making hot dog chili from scratch. You're transforming Restaurant-Style Taco Meat that's already sitting in your freezer into authentic Coney Island-style chili. Pull one portion, add a can of tomato sauce, simmer for 10 minutes. Done. This beanless version is the real deal-finely textured, richly spiced, exactly what you'd get at a classic hot dog stand. The genius is recognizing that taco meat and hot dog chili share the same DNA: seasoned ground beef with chili powder, cumin, and garlic. You're just adjusting the tomato profile and consistency.
The Batch Component Foundation
This assembly meal requires one portion (1¼ pounds) of Restaurant-Style Taco Meat from your freezer. If you haven't made that batch component yet, start there-it's the foundation that makes this 15-minute dinner possible.
The brilliance here is understanding ingredient relationships. Great hot dog chili is essentially seasoned ground beef with a specific texture and tomato base. Your Restaurant-Style Taco Meat is already cooked, perfectly browned, seasoned with chili powder, cumin, and garlic. All you're doing tonight is adding tomato sauce to shift the flavor profile from Mexican to Coney Island. Same protein base, completely different final dish. This is restaurant thinking: one prep, multiple applications.
What You're Actually Doing Tonight
You're not cooking-you're assembling. The Restaurant-Style Taco Meat already did the heavy lifting: browning the beef properly (no grey, steamed meat here), building the spice foundation, developing flavor through proper technique. Tonight you're simply adding canned tomato sauce to create that classic hot dog chili consistency and simmering briefly to marry the flavors.
Making hot dog chili from raw ingredients takes 45 minutes minimum-browning meat in batches so it actually caramelizes, seasoning in stages, simmering to concentrate flavors and achieve the right texture. This assembly version takes 15 minutes because 80% of the work happened weeks ago when you batch cooked. That's the difference between exhausted weeknight cooking and smart assembly with pre-made components.
Assembly Timeline
Honest timing: 15 minutes from freezer to serving bowl. Maybe 20 if you're grilling hot dogs fresh or toasting buns. This is legitimately faster than ordering delivery and infinitely better than opening a can of commercial chili with fillers and mystery ingredients.
The Actual Steps
- Thaw batch component: Pull Restaurant-Style Taco Meat from freezer. Forgot to thaw overnight? No problem-microwave 3-4 minutes or break frozen into a saucepan with a splash of water. Either method gets you fully thawed and hot in 5 minutes.
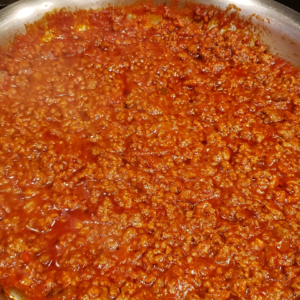
- Add tomato sauce: Pour in one 14.5-ounce can of tomato sauce, stir to combine. The meat is already perfectly seasoned; the tomato sauce just creates that classic chili consistency and adds the tomato flavor profile that defines hot dog chili.
- Adjust consistency: Add ½ cup water if you want thinner chili that soaks into the bun. Skip it for thicker chili that sits on top of the dog. Simmer 5-7 minutes to marry flavors.
- Serve: Ladle over hot dogs, top with diced raw onions and yellow mustard if you're going traditional Coney Island style. 15 minutes, start to table.
Why This Beats Takeout
- Faster: 15 minutes vs. 30-45 minutes for delivery, with no delivery fees or tip calculations
- Cheaper: $14 homemade vs. $28-32 for restaurant chili dogs for a family of four
- Better quality: You control the meat quality and seasoning-no fillers, no preservatives, no ingredients you can't pronounce
- Game day ready: Double the recipe in 20 minutes and feed a crowd for under $25-try that with restaurant catering
Cost Comparison
Let's run real numbers for feeding four people Coney Island-style hot dogs with beanless chili-the kind that actually tastes like ballpark food.
Real Numbers
- Batch component portion: $5.00 (1¼ pounds Restaurant-Style Taco Meat from your freezer inventory)
- Fresh additions: Tomato sauce $1.50, hot dogs $4.00, buns $2.50, onions/mustard $1.00
- Total homemade cost (serves 4): $14.00
- Restaurant equivalent: $28-32 for four chili dogs at a casual restaurant, more at a ballpark
- Savings per meal: $14-18, and yours tastes better because you control the ingredients
Variations & Substitutions
This basic formula-batch taco meat plus tomato sauce-adapts easily to different preferences, dietary needs, and regional hot dog chili styles.
Make It Your Own
- Add beans: While traditional Coney Island chili is beanless, stir in a can of kidney beans if your family prefers it-still authentic to many Midwest regional styles
- Spice it up: Add hot sauce, cayenne pepper, or diced jalapeños to the simmering chili for heat-Texas-style hot dog chili runs hotter
- Cheese it: Top with shredded sharp cheddar for loaded chili cheese dogs that feel truly indulgent
- Different application: Use this same chili over fries for chili cheese fries, over baked potatoes for a different quick dinner, or over scrambled eggs for a breakfast twist
- Sloppy Joe pivot: Add 2 tablespoons brown sugar and an extra ½ cup tomato sauce for instant sloppy joe filling-same batch component, completely different meal
This Is Why You Batch Cook
Three weeks ago you spent 90 minutes making Restaurant-Style Taco Meat and portioning it into your freezer. Tonight you spent 15 minutes turning one portion into authentic hot dog chili that tastes like you're at a ballpark concession stand. That's the system working exactly as designed. You made one investment of time, and you're still collecting dividends weeks later.
You're not meal prepping containers of reheated food that gets boring by Wednesday. You're building professional kitchen infrastructure in your freezer-versatile components that transform into completely different meals on demand. The same batch meat that became tacos last week just became Coney Island hot dogs tonight. Next week it might become chili cheese fries, a quick pasta meat sauce, or stuffed peppers. One batch component, unlimited applications when you're exhausted and everyone needs dinner now. This is the payoff.
Recipe
Hot Dog Chili (Bean less)
Equipment
- Cast iron skillet
- Saucepan
- Wooden spoon
- Can Opener
Ingredients
Hot Dog Chili
- 1 ¼ lb Restaurant-Style Taco Meat 1 batch, thawed
- 1 can Tomato Sauce 14.5 oz
- ½ cup Water optional, for desired consistency
Instructions
- Heat a cast iron skillet or saucepan over medium heat.
- Add the taco meat, break apart, and spread evenly.
- Add the tomato sauce and stir to combine.
- Add the water if you want thinner chili for easier spooning onto hot dogs, or skip it for thicker chili that stays on the dog.
- Reduce heat to low and simmer for 8-10 minutes, stirring occasionally, until heated through and the flavors have melded.
- Use immediately on hot dogs, hamburgers, or chili cheese fries.
- Refrigerate leftovers for up to 3 days.
- Do not freeze the finished chili.

Was this helpful?
You must be logged in to post a comment.