Batch Southern Fluffy Biscuit Dough
Equipment
- Food Processor
- Pastry Cutter
- Large Fork
- Rolling Pin
- Sheet Pan
- Biscuit Cutter
- Pastry brush
- Large Wooden Spoon
- Mixing bowl
- Freezer Bags
- Vacuum Sealer
- Parchment Paper
- Spice Grinder
- Mortar And Pestle
Ingredients
Biscuit Dough
- 360 g All Purpose Flour King Arthur brand
- 24 g Baking Powder Clabber Girl brand
- 2.4 g Baking Soda
- 6 g Kosher Salt Morton brand, ground to powder
- ½ cup Butter unsalted, grass-fed, cold, cubed
- 1 ¼ cup Buttermilk cold
Instructions
Prep
- Preheat oven to 450°F.
- Gather your equipment and ingredients.
- Make sure your butter and buttermilk are very cold.
- Grind the kosher salt to a powder using a spice grinder, mortar and pestle, or the back of a spoon.
- Sift flour, baking powder, and baking soda together.
- Mix the ground salt into the sifted dry ingredients.
Cut in Fat
- Add the dry ingredients to the food processor.
- Add cold cubed butter and pulse until the butter is cut into small pea-sized pieces.
Form Dough
- Add most of the cold buttermilk to the dry ingredients, reserving about 1/4 cup.
- Use a large wooden spoon to mix the dough until it starts to come together.
- Pour the dough out onto your counter.
- Fold the dough exactly 12 times, keeping the folds loose and shaping into an oval or rectangle.
- If the dough is too dry, use the reserved buttermilk to adjust consistency while folding.
Cut Biscuits
- Use a rolling pin to roll out the dough to about 3/4 inch thick.
- Dip the biscuit cutter in flour.
- Press the cutter straight down and pull straight up to cut biscuits, placing cuts as close together as possible.
- Dip the cutter in flour between each biscuit.
- Gather scraps gently, reshape, and cut the remaining biscuits.
Bake
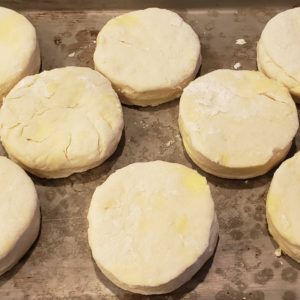
- Arrange biscuits on an ungreased sheet pan, placing them together for taller rise or apart for even rise in all directions.
- Bake on the middle rack for 13-15 minutes until tops are golden brown.
Finish and Serve
- Remove immediately from the oven.
- Brush tops with melted salted butter.
- Serve as is, with jam, covered in gravy, or as a sandwich.
Notes
Why Batch Biscuit Dough
It's 6 PM on a Wednesday. You're making fried chicken or a pot of soup, and you want fresh biscuits to complete the meal. But the thought of pulling out flour, cutting in butter, and cleaning up the mess makes you reach for the sad dinner rolls in your pantry instead. This is the exact moment batch biscuit dough earns its freezer space. You open the freezer, grab a vacuum-sealed portion, cut your biscuits, and slide them in the oven. Fifteen minutes later, you're serving fluffy, layered, golden-brown biscuits that taste like you spent an hour in the kitchen. The actual effort? About 90 seconds of hands-on work. This is the difference between serving whatever's convenient and serving what you actually want to eat.
The Restaurant Method
Professional kitchens don't make biscuit dough to order during service-that would be insane. They prepare dough in batches during prep hours, portion it, and refrigerate or freeze it until needed. The secret is keeping everything cold and handling the dough minimally. Cold butter creates steam pockets during baking, which creates those signature flaky layers. When you batch this at home, you're using the exact same technique: mix once, portion strategically, vacuum seal, and freeze. The dough goes from freezer to oven with minimal thawing, which actually helps maintain those cold butter pockets that make biscuits fluffy.
What Makes This Worth the Time
Here's what I learned after years of making biscuits: the mess is the same whether you're making 8 biscuits or 36. You're still dirtying the food processor, still flouring the counter, still cleaning up flour dust from surfaces you didn't even know you touched. So you don't want to make biscuits often-the cleanup is too much of a commitment for a weeknight. But if you make a big batch at one time, you only have to deal with that mess once. By scaling up your batch, you create that mess once and solve biscuit needs for months. The dough freezes exceptionally well because it's a low-hydration dough with plenty of fat, which prevents ice crystal formation. You're not compromising quality-you're actually ensuring consistency. Every portion comes from the same batch, mixed the same way, with the same ingredient ratios. Make tons of biscuits in one big batch, vacuum seal them, and save them for whenever you want fresh-baked bread without any of the work.
Time Investment & Meal Yield
Here's the honest math on what you're building when you batch biscuit dough:
What You're Actually Building
- Active prep: 25 minutes hands-on (measuring, pulsing in food processor, portioning dough)
- Passive time: None-this is pure active work, but it's straightforward
- Portioning & sealing: 15 minutes (divide dough, flatten into discs, vacuum seal, label)
- Result: 3-4 portions of dough = 24-36 biscuits over the next 3 months
The Real-World Timeline
You'll use this dough gradually over weeks. One portion becomes biscuits for Friday night fried chicken. Another portion turns into biscuits and gravy for Sunday breakfast. A third portion shows up when you make beef stew in February and want something better than store-bought rolls. This isn't meal prep in the traditional sense-it's ingredient infrastructure. You're building the foundation for multiple meals across different occasions, and each time you use it, you're saving the 45 minutes of active work plus the cleanup. The best part? You just take the dough out, let it thaw in the fridge overnight or for 20 minutes on the counter, cut your biscuits, and bake them. You don't have to do any work to it-just put them in the oven and you've got fresh biscuits.
Storage & The Freezer Reality
Let's address the concern directly: "Can I really freeze biscuit dough for three months?" Yes, and it's actually superior to what you'd buy in the grocery store freezer aisle. Those Pillsbury biscuits in the tube? They've been in a freezer somewhere in the supply chain for weeks before hitting the grocery shelf, where they sit refrigerated (which is harder on dough than freezing). Your vacuum-sealed batch dough is fresher, higher quality, and stored under better conditions than anything in the refrigerated biscuit section.
Why Vacuum Sealing Changes Everything
- Flat storage: Dough portions flatten into discs that stack beautifully in your freezer, taking up minimal space
- Fast deployment: Cut biscuits while still frozen, or let thaw 20 minutes at room temperature if you want easier cutting-you can even proof them in the fridge overnight for next-morning baking
- Zero freezer burn: Vacuum sealing removes air, preventing oxidation and maintaining butter quality for 3-6 months (honestly, up to 12 months if your seal is good)
- Professional standard: Commercial bakeries freeze dough all the time-it's how croissants and pastries reach your local coffee shop looking fresh
The Commercial Food Comparison
Those frozen Eggo waffles in your freezer? Manufactured weeks ago, shipped to a distributor's freezer, transferred to the grocery store's freezer, and expected to sit in yours for months. The biscuit dough you vacuum seal today is exponentially fresher. You're using higher-quality butter, real buttermilk, and no preservatives or dough conditioners. Three weeks from now, your frozen dough is still fresher than what you'd buy "fresh" at the store today. This is exactly how restaurant kitchens operate-they're not making everything from scratch during dinner service, they're deploying prep work done hours or days earlier under professional storage conditions. Your freezer is now operating like a professional walk-in.
Cost Breakdown
Let's calculate what this batch actually costs compared to buying biscuits repeatedly or ordering them at restaurants:
Batch Cost Calculation
Ingredients breakdown:
- All-purpose flour (360g/3 cups): $0.45 (bulk King Arthur flour, $⅘-lb bag at Costco)
- Butter (½ cup/113g): $1.25 (grass-fed unsalted, $5/lb at Costco)
- Buttermilk (1.25 cups): $1.20 (quart at $3.80)
- Baking powder, baking soda, salt: $0.30 (negligible per batch)
- Total batch cost: $3.20
- Biscuits created: 24-30 biscuits (depending on cutter size)
- Cost per biscuit: $3.20 ÷ 27 average = $0.12 per biscuit
The Savings Add Up
Per-meal comparison (8 biscuits):
- Homemade batch biscuits: $0.12 × 8 = $0.96
- Pillsbury Grands refrigerated biscuits: $4.50 per tube (8 biscuits)
- Red Lobster Cheddar Bay biscuits mix: $3.80 (makes 10 biscuits, plus butter)
- Restaurant biscuit basket (3 biscuits): $4-6 at casual dining
- Savings per 8-biscuit serving: $4.50 - $0.96 = $3.54 vs. refrigerated tubes
- Total batch savings: If you make 3 batches of 8 biscuits from your portions = $3.54 × 3 = $10.62 saved vs. buying tubes
And that's just comparing to refrigerated dough tubes, which are themselves a compromise. Compared to restaurant biscuits or bakery-quality options, you're saving even more while serving better food. The real value isn't just money-it's having restaurant-quality biscuits available any night of the week without the 45-minute commitment or the cleanup mess.
Using This Component
Here's how frozen biscuit dough becomes actual meals in your weekly rotation:
Quick Assembly Meals
- Fried Chicken Dinner: Pull dough portion from freezer while chicken fries, cut biscuits, bake 12-15 minutes alongside your chicken rest time-complete Southern dinner in 30 minutes
- Biscuits and Gravy Breakfast: Bake biscuits while making sausage gravy, split and smother with gravy, breakfast solved in 20 minutes total
- Soup Night Upgrade: Any pot of soup becomes a complete meal when you bake a batch of biscuits-tomato soup, chicken noodle, beef stew all benefit from fresh bread
- Breakfast Sandwiches: Bake biscuits, split and fill with fried eggs and cheese, freeze assembled sandwiches for grab-and-go mornings
- Emergency Bread Basket: Last-minute dinner guests? Biscuits go from freezer to table in 20 minutes and look like you planned ahead
This is how you stock a professional kitchen at home. You're not making biscuits from scratch every time you want them-you're deploying prep work you did once, weeks ago, when you had the time and energy. It's Tuesday night, you're exhausted, and your freezer just gave you fresh-baked biscuits without the mess, the effort, or the decision fatigue. That's the entire point of batch cooking infrastructure. Cook once, serve for months, reclaim your weeknight sanity.
Recipe
Batch Southern Fluffy Biscuit Dough
Equipment
- Food Processor
- Pastry Cutter
- Large Fork
- Rolling Pin
- Sheet Pan
- Biscuit Cutter
- Pastry brush
- Large Wooden Spoon
- Mixing bowl
- Freezer Bags
- Vacuum Sealer
- Parchment Paper
- Spice Grinder
- Mortar And Pestle
Ingredients
Biscuit Dough
- 360 g All Purpose Flour King Arthur brand
- 24 g Baking Powder Clabber Girl brand
- 2.4 g Baking Soda
- 6 g Kosher Salt Morton brand, ground to powder
- ½ cup Butter unsalted, grass-fed, cold, cubed
- 1 ¼ cup Buttermilk cold
Instructions
Prep
- Preheat oven to 450°F.
- Gather your equipment and ingredients.
- Make sure your butter and buttermilk are very cold.
- Grind the kosher salt to a powder using a spice grinder, mortar and pestle, or the back of a spoon.
- Sift flour, baking powder, and baking soda together.
- Mix the ground salt into the sifted dry ingredients.
Cut in Fat
- Add the dry ingredients to the food processor.
- Add cold cubed butter and pulse until the butter is cut into small pea-sized pieces.
Form Dough
- Add most of the cold buttermilk to the dry ingredients, reserving about ¼ cup.
- Use a large wooden spoon to mix the dough until it starts to come together.
- Pour the dough out onto your counter.
- Fold the dough exactly 12 times, keeping the folds loose and shaping into an oval or rectangle.
- If the dough is too dry, use the reserved buttermilk to adjust consistency while folding.
Cut Biscuits
- Use a rolling pin to roll out the dough to about ¾ inch thick.
- Dip the biscuit cutter in flour.
- Press the cutter straight down and pull straight up to cut biscuits, placing cuts as close together as possible.
- Dip the cutter in flour between each biscuit.
- Gather scraps gently, reshape, and cut the remaining biscuits.
Bake
- Arrange biscuits on an ungreased sheet pan, placing them together for taller rise or apart for even rise in all directions.
- Bake on the middle rack for 13-15 minutes until tops are golden brown.
Finish and Serve
- Remove immediately from the oven.
- Brush tops with melted salted butter.
- Serve as is, with jam, covered in gravy, or as a sandwich.

Was this helpful?
You must be logged in to post a comment.