
Buttery Cast-Iron Skillet Dinner Rolls
Equipment
- Cast iron skillet
- Mixing bowl
- Kitchen Towel
- Pastry brush
- Stand Mixer
Ingredients
Dough
- 1 lb Bread Flour
- 2 ¼ tsp Active Dry Yeast 1 packet
- 2 Tbsp Sugar
- 2 tsp Kosher Salt Morton brand
- ¼ cup Avocado Oil
- 1 cup Milk warm
- 1 Egg large
Butter
- 2 oz Butter grass-fed, salted, melted, for brushing
Pan
- 1 Tbsp Avocado Oil for greasing skillet
Instructions
Prep
- Combine warm milk, sugar, and yeast in a mixing bowl.
- Let sit for 5-10 minutes until foamy.
- Add the melted butter and egg, stirring to combine.
- Gradually mix in the flour and salt.
- Knead until a soft elastic dough forms, about 8 minutes by hand or 4 minutes with a stand mixer.
- Place the dough in a greased bowl and cover with a clean kitchen towel.
- Let rise in a warm spot for 1 to 1 1/2 hours until doubled in size.
Shape
- Punch down the dough and divide into 12 equal pieces.
- Shape into balls.
- Grease a cast iron skillet with avocado oil.
- Arrange the dough balls in the skillet, leaving a little space between each one.
- Cover and let rise again for 30-40 minutes until puffy.
Bake
- Preheat oven to 375°F.
- Brush the rolls generously with melted butter.
- Bake for 20-25 minutes until golden brown.
- Remove from oven and brush with more melted butter before serving warm.
Quick Method - Frozen Dough
- Grease a cast iron skillet with avocado oil.
- Arrange 18 frozen dough balls in the skillet.
- Cover with a towel and let thaw and rise until doubled, about 1-2 hours.
- Brush with melted butter and bake at 375°F for 20-25 minutes until golden brown.
- Brush with more butter before serving.
Notes
Why Batch Dinner Rolls
It's Tuesday night. You've got a pot of chili on the stove or you're reheating that batch of carnitas from your freezer. What you need is fresh bread to complete the meal, but store-bought rolls taste like cardboard and spending 90 minutes making dough from scratch isn't happening. This is where batch-prepared dinner roll dough changes your kitchen operation. You pull a vacuum-sealed portion from your freezer, proof it while your main dish reheats, and bake golden, buttery rolls in a cast-iron skillet. Fifteen minutes of passive proofing, twelve minutes in the oven. That's restaurant-quality bread without the restaurant markup or the all-afternoon project.
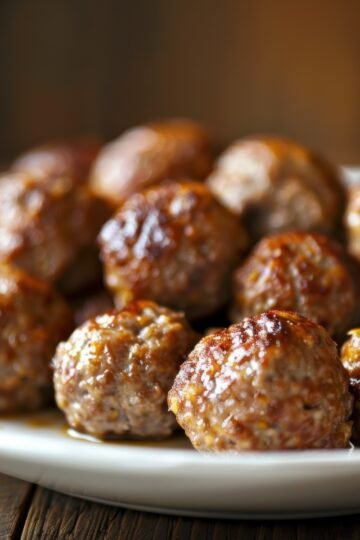
These rolls will take you back to old school days-that's what hits me every time I pull them from the oven. The cast-iron skillet is perfect for cooking and serving them. I like using cast iron for both-it looks good sitting on the counter when people arrive, and you skip the transfer step. But honestly, you can use a butter pan or any oven-safe dish. They proof up, brown beautifully, and come out soft and delicious. Cover them with butter when they come out of the oven-it melts and goes everywhere. It's basically a pull-apart loaf that everybody digs into. That's the part that gets me: watching people reach for another roll without thinking about it.
The Restaurant Method
Professional kitchens don't make fresh dough for every service. They batch prep when time allows, portion it, and freeze it. The key is proper mixing technique and vacuum sealing that prevents freezer burn. A stand mixer develops gluten structure that survives freezing better than hand-kneaded dough. Portioning before freezing means you take out exactly what you need-no thawing an entire batch when you only want six rolls for dinner.
What Makes This Worth the Time
Bread dough is one of those batch components where the math just works in your favor. Active mixing takes 15 minutes. First rise is passive-you're doing other things. Portioning and vacuum sealing takes another 20 minutes. That's roughly 35 minutes of hands-on work to create dough for 24-32 rolls that live in your freezer for three months. Each portion becomes fresh-baked bread in under 30 minutes, faster than driving to the bakery. The cast-iron skillet method creates a crispy bottom crust and soft interior that grocery store frozen rolls can't match. You're not meal prepping-you're stocking your freezer with restaurant-quality bread infrastructure.
Time Investment & Meal Yield
Here's the honest math on what you're building:
What You're Actually Building
- Active prep: 15 minutes hands-on (mixing dough in stand mixer, measuring ingredients)
- Passive rising: 60-75 minutes first rise (you're doing laundry, watching TV, living your life)
- Portioning & sealing: 20 minutes (divide dough, vacuum seal portions, label with date)
- Result: 4-6 portions = 24-32 rolls = 6-8 meals with fresh bread over next 3 months
The Real-World Timeline
You make this batch on a Sunday afternoon in January. First portion gets used that week with soup. Second portion shows up two weeks later with chili. By March, you're still pulling fresh bread from your freezer for weeknight dinners, each time thinking "I'm so glad past-me did this." That initial time investment spreads across months of convenience. This isn't about cooking all your meals on Sunday-it's about having professional-grade components ready when you need them.
Storage & The Freezer Reality
Let's address the concern about frozen dough sitting in your freezer for months. Commercial frozen bread products-the ones you buy at the grocery store-sit in the manufacturer's freezer for weeks, then the distributor's freezer for weeks, then the grocery store freezer for weeks more. By the time you buy them, they're expected to sit in your freezer for additional months. Your batch-prepared dinner roll dough goes from your mixer to your freezer in under two hours. It's fresher on day one and stays fresher throughout its freezer life because you're using vacuum sealing instead of thin plastic bags.
Why Vacuum Sealing Changes Everything
- Flat storage: Vacuum-sealed portions stack efficiently in your freezer, no awkward round bowls taking up space
- Fast proofing: Pull a portion the night before, let it proof in the fridge overnight, or proof at room temperature for 60-75 minutes same-day
- Zero freezer burn: 3 months minimum freezer life, up to 6 months if your freezer maintains consistent temperature
- Professional standard: This is exactly how commercial bakeries and restaurant kitchens manage dough inventory
The Commercial Food Comparison
That tube of refrigerated biscuits at the grocery store? Manufactured weeks ago, shipped through distribution networks, sitting on refrigerated shelves with preservatives to extend shelf life. Your dinner roll dough has five ingredients: flour, yeast, milk, egg, and fat. No preservatives needed because vacuum sealing does the preservation work. When you bake, you're getting actually fresh bread, not bread-flavored product designed for extended commercial storage.
Cost Breakdown
Bread is one of those categories where homemade batch cooking delivers massive savings. Here's the actual math using bulk warehouse pricing:
Batch Cost Calculation
Ingredients breakdown:
- Bread flour: 1 lb × $0.75/lb = $0.75
- Active dry yeast: 1 packet = $0.30 (bulk jars drop this to $0.10)
- Sugar: 2 tablespoon = $0.05
- Kosher salt: 2 teaspoon = $0.02
- Avocado oil: ¼ cup = $0.40
- Milk: 1 cup = $0.35
- Egg: 1 large = $0.25
- Butter: 2 oz = $0.50
- Total batch cost: $2.62
- Portions created: 24-32 rolls (averaging 28 rolls)
- Cost per roll: $2.62 ÷ 28 = $0.09 per roll
The Savings Add Up
Per-meal comparison (6 rolls per meal):
- Homemade batch portion: $0.09 × 6 = $0.54 for six fresh-baked rolls
- Grocery store bakery rolls: $4.99-$6.99 for 6 rolls
- Restaurant dinner rolls: $2-$4 for a basket of 4-6 rolls at casual dining
- Savings per meal: $5.50 (grocery average) - $0.54 (homemade) = $4.96 saved
- Total batch savings: $4.96 × 4-5 meals = $20-$25 saved per batch
The real win isn't just the money-it's having fresh-baked bread available on a Tuesday without the Tuesday effort. You're paying $0.54 for what tastes like $6 bakery bread, and you didn't have to leave your house.
Using This Component
Dinner roll dough is one of the most versatile batch components in your freezer. Here's how these portions become actual meals:
Quick Assembly Meals
- Weeknight Chili Dinner: Pull a portion the night before, let proof in fridge overnight, bake in cast-iron skillet while chili reheats-complete comfort food dinner in 25 minutes
- Soup and Bread Night: Proof dough at room temperature for 75 minutes while soup simmers, brush with butter, bake until golden-fresh bread elevates simple soup to satisfying meal
- Breakfast Rolls: Proof overnight, bake in the morning, brush with honey butter-fresh rolls with scrambled eggs or as breakfast sandwiches
- Holiday Side: When Thanksgiving or Christmas dinner needs fresh rolls, pull two portions, proof, and bake-no last-minute dough stress when you're managing ten other dishes
This is how you stock a professional kitchen at home. Two hours of work on a Sunday creates three months of fresh-baked bread capability. You're not trying to become a full-time baker-you're building infrastructure that turns "I wish we had fresh bread" into "I'll pull some from the freezer." Cook once, bake fresh for weeks, save money, and reclaim those Tuesday nights when you're too tired to start from scratch but still want something better than store-bought.
Recipe
Buttery Cast-Iron Skillet Dinner Rolls
Equipment
- Cast iron skillet
- Mixing bowl
- Kitchen Towel
- Pastry brush
- Stand Mixer
Ingredients
Dough
- 1 lb Bread Flour
- 2 ¼ teaspoon Active Dry Yeast 1 packet
- 2 tablespoon Sugar
- 2 teaspoon Kosher Salt Morton brand
- ¼ cup Avocado Oil
- 1 cup Milk warm
- 1 Egg large
Butter
- 2 oz Butter grass-fed, salted, melted, for brushing
Pan
- 1 tablespoon Avocado Oil for greasing skillet
Instructions
Prep
- Combine warm milk, sugar, and yeast in a mixing bowl.
- Let sit for 5-10 minutes until foamy.
- Add the melted butter and egg, stirring to combine.
- Gradually mix in the flour and salt.
- Knead until a soft elastic dough forms, about 8 minutes by hand or 4 minutes with a stand mixer.
- Place the dough in a greased bowl and cover with a clean kitchen towel.
- Let rise in a warm spot for 1 to 1 ½ hours until doubled in size.
Shape
- Punch down the dough and divide into 12 equal pieces.
- Shape into balls.
- Grease a cast iron skillet with avocado oil.
- Arrange the dough balls in the skillet, leaving a little space between each one.
- Cover and let rise again for 30-40 minutes until puffy.
Bake
- Preheat oven to 375°F.
- Brush the rolls generously with melted butter.
- Bake for 20-25 minutes until golden brown.
- Remove from oven and brush with more melted butter before serving warm.
Quick Method - Frozen Dough
- Grease a cast iron skillet with avocado oil.
- Arrange 18 frozen dough balls in the skillet.
- Cover with a towel and let thaw and rise until doubled, about 1-2 hours.
- Brush with melted butter and bake at 375°F for 20-25 minutes until golden brown.
- Brush with more butter before serving.
Was this helpful?
You must be logged in to post a comment.