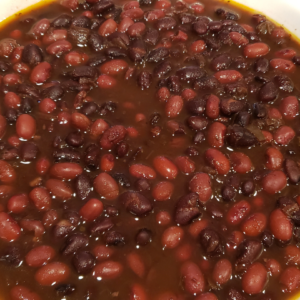
Chili Beans
Equipment
- Large Pot
- Dutch Oven
- Pressure Cooker
Ingredients
- 1 lb Small Red Beans dried
- 1 lb Black Beans dried
- 12 cup Water
- 2 Tbsp Beef Fat or lard
- 12 oz Onions chopped, frozen 12 oz package works perfectly
- 12 oz Green Peppers chopped, frozen 12 oz package works perfectly
- 2 Tbsp Kosher Salt Morton brand
- 1 Tbsp Ground Cumin
- 1 Tbsp Dried Oregano
- 1 Tbsp Dried Thyme
- 1 Tbsp Granulated Garlic
- 1 Tbsp Granulated Onion
Instructions
Prep
- Rinse both bags of beans under cold water and pick out any debris or broken beans.
- If soaking, cover beans with water by 2 inches and refrigerate overnight.
- Drain and rinse soaked beans before cooking.
Cook
- Heat beef fat in a large pot or Dutch oven over medium-high heat.
- Add the chopped onions and green peppers.
- Sauté until the onions are translucent and the peppers have softened, about 5-7 minutes.
- Add the beans, 12 cups of water, kosher salt, cumin, oregano, thyme, granulated garlic, and granulated onion.
- Stir to combine.
- Bring to a boil, then reduce to a low simmer.
- Cover and cook for 1 1/2 to 2 hours, stirring occasionally.
- Check the water level every 30 minutes and add more if the beans are no longer submerged.
- Cook until beans are tender and creamy but still hold their shape.
Notes
Why Batch Chili Beans
Tuesday night. You're home at 6 PM, decision-fatigued, and the idea of soaking dried beans overnight then cooking them for two hours tomorrow sounds impossible. This is the exact scenario that kills home cooking-not lack of skill, but lack of time when you actually need dinner. Batch chili beans sitting in your freezer change this equation completely. Pull a portion from the freezer in the morning, toss it in the fridge. By evening, you're reheating beans while rice cooks. Twenty minutes later, you've got restaurant-quality chili, bean bowls, or loaded nachos. No takeout menu, no $15 burrito bowl, no compromise.
The reality: dried beans are cheap, nutritious, and delicious, but they require planning and time that doesn't exist on weeknights. Batch cooking solves this by frontloading all that soaking and simmering into one Sunday session. You're not meal prepping-you're stocking a professional walk-in freezer at home. This is infrastructure, not a meal.
The Restaurant Method
Commercial kitchens don't cook beans to order. They batch-cook on prep days, portion into containers, and pull what they need for service. A single prep cook makes enough beans on Monday morning to serve hundreds of customers through the week. The technique is dead simple: soak overnight, simmer with aromatics and fat until tender, portion immediately while hot, cool rapidly, and store properly.
What Makes This Worth the Time
When I started developing this system, I was fixated on building recipes around complete packages-no measuring out half a bag of something, no leftover ingredients cluttering the fridge. A pound of small red beans and a pound of black beans makes this work perfectly. You're opening two bags, dumping both in, using the whole thing. The combination isn't arbitrary-after experimenting with different bean varieties, I found this mix delivers the best texture and coloring for chili specifically. The small red beans hold their shape without getting mushy, while black beans add depth and visual contrast that straight pinto beans can't match.
Using beef fat or lard adds richness that grocery store canned beans never achieve. Frozen chopped onions and peppers mean zero knife work-professional convenience at home prices. The critical upgrade from canned beans: you control the seasoning intensity, the bean texture stays intact, and the cooking liquid becomes a flavorful base instead of starchy can water.
Time Investment & Meal Yield
Here's the honest math on what you're building with this batch:
What You're Actually Building
- Active prep: 15 minutes hands-on (dump beans, onions, peppers in pressure cooker, stir in seasonings)
- Passive cooking: 75 minutes in pressure cooker (you're watching TV, doing laundry, living your life)
- Portioning & sealing: 20 minutes (ladle into vacuum bags, seal, label with date)
- Result: 16 portions = 16 complete meals over next 3 months
The Real-World Timeline
You'll cook these beans once on a Sunday afternoon in March. By June, you've used them for weeknight chili, emergency lunches when the fridge is empty, last-minute taco Tuesday when you forgot to plan dinner, and that Saturday when friends came over unexpectedly. Each time, dinner happened in 20 minutes instead of 2+ hours. That's the actual value-not cooking efficiency, but reclaiming your Tuesday nights for the next three months.
Storage & The Freezer Reality
Let's address the concern directly: "Won't beans frozen for months taste terrible?" No. And here's why your homemade frozen beans are actually fresher than store-bought options.
Why Vacuum Sealing Changes Everything
- Flat storage: Vacuum-sealed bags stack like files in a drawer-no freezer Tetris with round containers
- Fast thawing: Overnight in fridge, or quick-thaw in warm water if you forgot to plan ahead
- Zero freezer burn: Properly sealed beans maintain texture and flavor for 3-6 months, no ice crystals or off flavors
- Professional standard: Restaurant kitchens vacuum-seal stocks, sauces, and beans for weeks of service-you're using the same method
The Commercial Food Comparison
That frozen burrito in the grocery store freezer? It was manufactured weeks ago, sat in a distributor's freezer for weeks, then sat in the grocer's freezer for more weeks before you bought it. It's expected to sit in your freezer for months. Your batch chili beans-cooked fresh last Sunday, vacuum-sealed immediately, stored properly-are FRESHER than that burrito will ever be. This isn't compromise food. This is professional storage technique applied to higher-quality ingredients than food manufacturers use.
Cost Breakdown
Dried beans are absurdly cheap compared to their yield. Here's the actual math using realistic warehouse club prices:
Batch Cost Calculation
Ingredients breakdown:
- Small red beans: 1 lb × $1.50/lb = $1.50
- Black beans: 1 lb × $1.50/lb = $1.50
- Frozen chopped onions: 12 oz bag = $1.50
- Frozen chopped peppers: 12 oz bag = $1.50
- Beef fat/lard: 2 tablespoon = $0.25
- Seasonings (salt, cumin, oregano, thyme, garlic, onion): $1.00
- Total batch cost: $7.25
- Portions created: 16
- Cost per portion: $7.25 ÷ 16 = $0.45
The Savings Add Up
Per-meal comparison:
- Homemade portion: $0.45 (just the beans-add rice, toppings, tortillas separately)
- Chipotle burrito bowl: $10.50
- Canned chili beans for equivalent serving: $2.50
- Restaurant chili side: $5.00
- Savings per meal vs. Chipotle: $10.50 - $0.45 = $10.05
- Total batch savings: $10.05 × 16 portions = $160.80 saved vs. restaurant meals
Even if you only compare against canned beans ($2.50 per serving), you're saving $2.05 per portion, or $32.80 per batch. But the real savings comes from avoiding takeout on those exhausted Tuesday nights when cooking from scratch isn't happening.
Using This Component
These beans aren't a complete meal-they're the foundation that turns 20 minutes of assembly into restaurant-quality dinner. Here's how this component becomes actual food on your table:
Quick Assembly Meals
- Weeknight Chili: Thaw beans overnight, brown 1 lb ground beef, add beans with liquid, simmer 15 minutes with extra cumin and chili powder. Serve with cornbread or over rice.
- Burrito Bowls: Reheat beans while rice cooks in rice cooker (both done in 20 minutes). Top with shredded cheese, salsa, sour cream, avocado. Faster than Chipotle, costs $3 instead of $12.
- Loaded Nachos: Spread tortilla chips on sheet pan, top with reheated beans and cheese, broil 5 minutes. Add jalapeños, cilantro, quick-pickled onions.
- Bean and Cheese Quesadillas: Mash reheated beans slightly, spread on tortillas with cheese, crisp in skillet. Kids eat these without complaint.
- Southwestern Soup Base: Combine beans with chicken stock, add frozen corn and diced tomatoes, simmer 10 minutes. Instant tortilla soup.
This is how you stock a professional kitchen at home. Cook once on Sunday, solve sixteen dinners over the next three months, save hundreds of dollars versus takeout, and reclaim your Tuesday nights from decision fatigue. Your freezer isn't storage for leftovers-it's a walk-in full of ready-to-deploy components that make you look like you have your life together, even when you absolutely don't.
Recipe
Chili Beans
Equipment
- Large Pot
- Dutch Oven
- Pressure Cooker
Ingredients
- 1 lb Small Red Beans dried
- 1 lb Black Beans dried
- 12 cup Water
- 2 tablespoon Beef Fat or lard
- 12 oz Onions chopped, frozen 12 oz package works perfectly
- 12 oz Green Peppers chopped, frozen 12 oz package works perfectly
- 2 tablespoon Kosher Salt Morton brand
- 1 tablespoon Ground Cumin
- 1 tablespoon Dried Oregano
- 1 tablespoon Dried Thyme
- 1 tablespoon Granulated Garlic
- 1 tablespoon Granulated Onion
Instructions
Prep
- Rinse both bags of beans under cold water and pick out any debris or broken beans.
- If soaking, cover beans with water by 2 inches and refrigerate overnight.
- Drain and rinse soaked beans before cooking.
Cook
- Heat beef fat in a large pot or Dutch oven over medium-high heat.
- Add the chopped onions and green peppers.
- Sauté until the onions are translucent and the peppers have softened, about 5-7 minutes.
- Add the beans, 12 cups of water, kosher salt, cumin, oregano, thyme, granulated garlic, and granulated onion.
- Stir to combine.
- Bring to a boil, then reduce to a low simmer.
- Cover and cook for 1 ½ to 2 hours, stirring occasionally.
- Check the water level every 30 minutes and add more if the beans are no longer submerged.
- Cook until beans are tender and creamy but still hold their shape.
Was this helpful?
You must be logged in to post a comment.