Taco Cheese Skillet Dip (Half & Half)
Ingredients
Equipment
Method
- Preheat a 10-12 inch cast iron skillet in a 350°F oven for 10 minutes, or heat on the stovetop over low heat.
- Heat the taco meat in a separate skillet over medium-low heat until warmed through.
- Prepare the white cheese sauce and keep warm.
- Carefully remove the hot cast iron skillet.
- Spoon the warm taco meat into one half of the skillet.
- Pour the warm cheese sauce into the other half, keeping them separate.
- Spoon pico de gallo in a line down the center where the two sides meet.
- Place the hot skillet on a trivet at the table.
- Serve immediately with tortilla chips and warm flour tortillas.
Notes
Tried this recipe?
Let us know how it was!Why This Assembly Meal Works
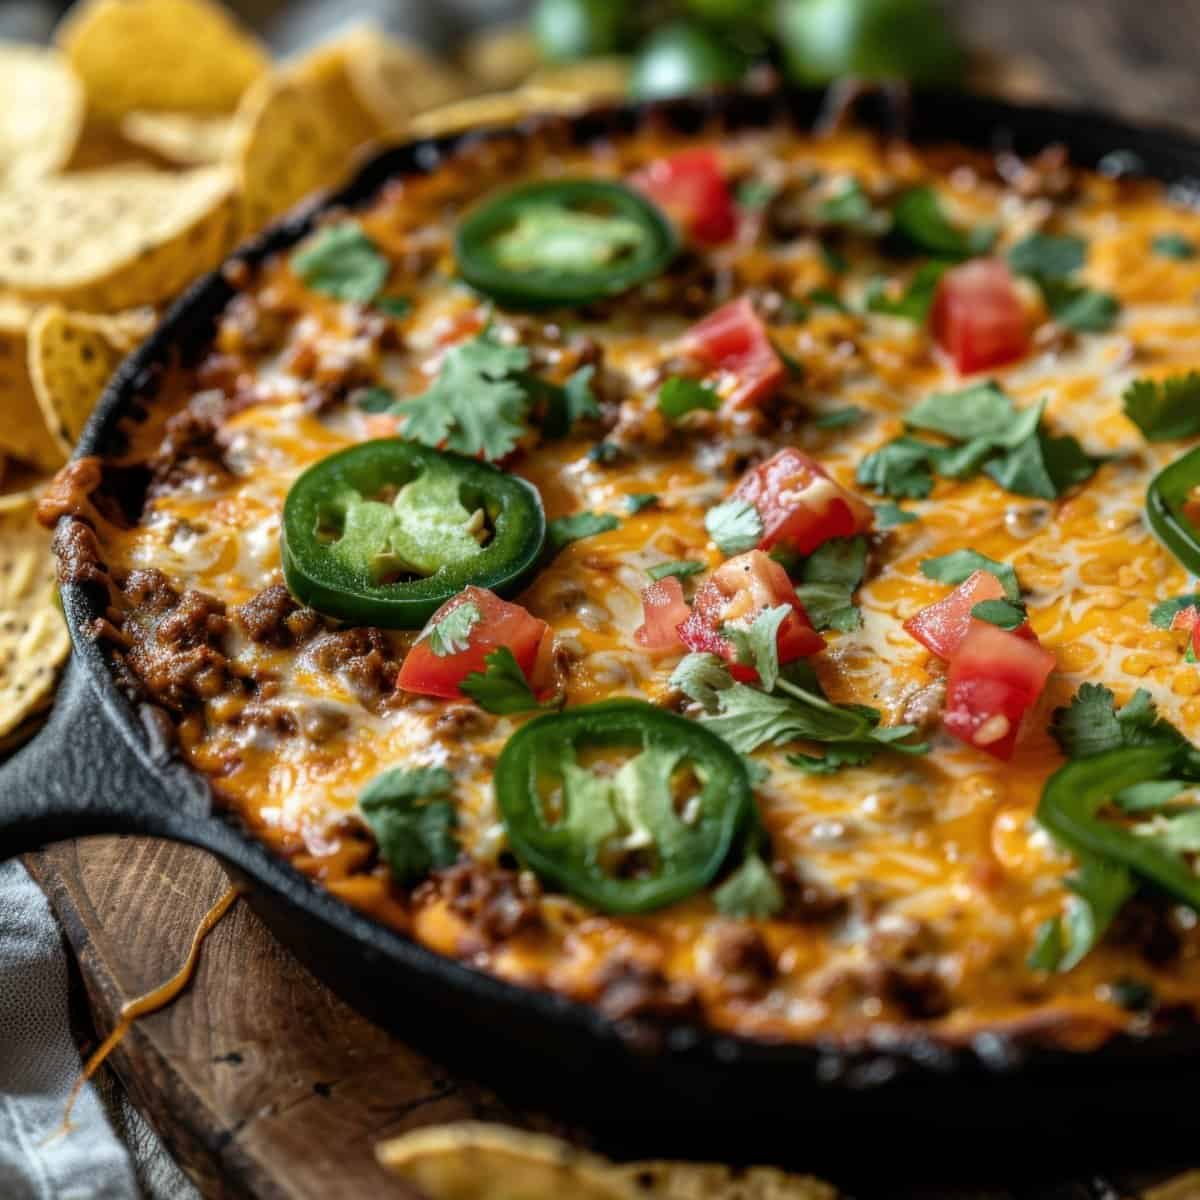
Victor spent years eating his taco meat with corn chips. Just that-perfectly seasoned meat, crunchy chips, nothing else. And his cheese sauce with corn chips. Both combinations were perfect on their own, distinct flavors that he loved equally. One day he decided he didn't have to choose. He put both in the same cast iron skillet but kept them separate so the individual flavors wouldn't get lost in the mixing. Taco meat on one side, cheese sauce on the other. Now every chip, every piece of flour tortilla gets dipped into whichever side you want, or dragged through both. You control every bite, and both flavors stay clean and distinct.
The cast iron skillet does real work here beyond just looking impressive. Victor cooks with cast iron constantly because of its versatility and heat retention-it's the perfect vehicle to take food from stove to table and keep it hot. This matters when you're entertaining. No rushing because the cheese is congealing or the meat is cooling off. The skillet holds temperature while people hover around it for the entire game or gathering, which means you're not constantly running back to the kitchen to reheat things. You set it down, hand people chips, and let them go at it.
The Batch Component Foundation
This assembly meal requires one portion of Restaurant-Style Taco Meat from your freezer. If you haven't made that batch component yet, start there-it's the foundation that makes this 20-minute reality possible. That batch recipe gives you properly seasoned, restaurant-quality taco meat in individually frozen portions ready to deploy.
Having that taco meat pre-made changes everything tonight. The seasoning is already dialed in perfectly. The meat is cooked, the fat content is correct for texture and flavor. The portion is measured and ready to go. You're not browning ground beef, draining grease, and figuring out cumin ratios while people are texting that they're pulling into your driveway. You're reheating a finished product and building around it.
What You're Actually Doing Tonight
You're not cooking. You're assembling components. Pull frozen taco meat from the freezer and reheat it in a skillet. Make a simple white cheese sauce-it's literally just melted cheese and milk, requires zero technical skill. Chop tomatoes, onions, and cilantro for fresh pico de gallo. Arrange everything in a hot cast iron skillet and carry it to the table.
The difference between making taco meat from scratch tonight versus using your batch component is 60 minutes of active work. Browning meat, draining fat, measuring six different spices, simmering, tasting, adjusting seasoning-all of that happened weeks ago. Tonight takes 20 minutes and most of that is just waiting for things to heat through while you chop vegetables.
Assembly Timeline
This genuinely takes 20 minutes if your taco meat is frozen solid. If you remembered to move it to the refrigerator this morning, you'll save five minutes. Either way, you're faster than the pizza delivery driver stuck in game day traffic.
The Actual Steps
- Reheat batch component: Frozen taco meat goes straight into a skillet over medium heat with a splash of water. Cover and let it steam for 8-10 minutes, breaking it up as it thaws. From refrigerator takes 4-5 minutes.
- Make cheese sauce: While meat reheats, melt white American cheese with milk in a small pot. Stir until smooth. Takes 5 minutes, impossible to mess up.
- Prep fresh elements: Chop tomatoes, white onion, cilantro, and jalapeño for pico de gallo. Mix with lime juice and salt. Takes 5 minutes with a decent knife.
- Assemble and serve: Put reheated taco meat on one side of your hot cast iron skillet, cheese sauce on the other. Create a line of pico de gallo between them as the divider. Serve immediately with flour tortillas or tortilla chips. From freezer to table: 20 minutes.
Why This Beats Takeout
- Faster: 20 minutes assembly vs. 45 minutes for delivery during game day surge pricing
- Cheaper: $10 homemade vs. $32 for restaurant queso and beef nachos for a group
- Better quality: Real cheese, fresh pico, seasoned meat you made yourself-not processed cheese sauce and mystery taco filling
- No decision fatigue: Batch component is already in your freezer, you're just executing the assembly plan
Cost Comparison
This skillet dip serves 6-8 people as an appetizer or 4 as a light dinner with additional sides. The cost breakdown assumes you're pulling from batch components and pantry staples you already have stocked.
Real Numbers
- Batch component portion: $3.50 (one portion Restaurant-Style Taco Meat from freezer)
- Fresh additions: White American cheese $2.50, tomatoes/onion/cilantro for pico $2.00, tortillas or chips $2.00
- Total homemade cost (serves 6-8): $10.00
- Restaurant equivalent: $28-35 for comparable queso dip and beef appetizer for a group
- Savings per meal: $18-25, plus you controlled the ingredients, spice level, and portion sizes
Variations & Substitutions
The half-and-half presentation format works with almost any combination of seasoned protein and melted cheese. Once you understand the structure, you can adapt it based on what batch components you have frozen or what your family actually wants to eat.
Make It Your Own
- Different protein: Substitute Batch Carnitas, Chili Beef, or even shredded Batch Chicken for the taco meat-anything that's already seasoned and just needs reheating works
- Cheese variations: Try yellow queso with Velveeta and Rotel, traditional cheese dip with sharp cheddar, or keep the white American for that authentic Tex-Mex restaurant style
- Spice level: Control heat with the type of salsa or hot sauce you serve alongside, or add pickled jalapeños to the pico de gallo dividing line
- Serving style: Use flour tortillas for a more substantial dip experience, tortilla chips for traditional queso, or both and let people choose their own adventure
This Is Why You Batch Cook
Three weeks ago you spent 90 minutes making Restaurant-Style Taco Meat. You probably froze six portions. Tonight friends texted last minute, you pulled one portion out, and had a party-ready appetizer on the table in 20 minutes while the cast iron kept everything hot and impressive-looking. That's the batch cooking system working exactly as designed.
You're not meal prepping containers of sad reheated food. You're stocking a professional kitchen infrastructure that delivers restaurant-quality results on demand. When people text "can we come watch the game?" you say yes because you know exactly what's in your freezer and how fast you can execute. That confidence-that capability to say yes to your people without stress or scrambling-is what this system builds. Victor figured out you don't have to choose between the taco meat and the cheese sauce. You don't have to choose between convenience and quality either.
Recipe
Taco Cheese Skillet Dip (Half & Half)
Ingredients
Equipment
Method
- Preheat a 10-12 inch cast iron skillet in a 350°F oven for 10 minutes, or heat on the stovetop over low heat.
- Heat the taco meat in a separate skillet over medium-low heat until warmed through.
- Prepare the white cheese sauce and keep warm.
- Carefully remove the hot cast iron skillet.
- Spoon the warm taco meat into one half of the skillet.
- Pour the warm cheese sauce into the other half, keeping them separate.
- Spoon pico de gallo in a line down the center where the two sides meet.
- Place the hot skillet on a trivet at the table.
- Serve immediately with tortilla chips and warm flour tortillas.


Was this helpful?
You must be logged in to post a comment.