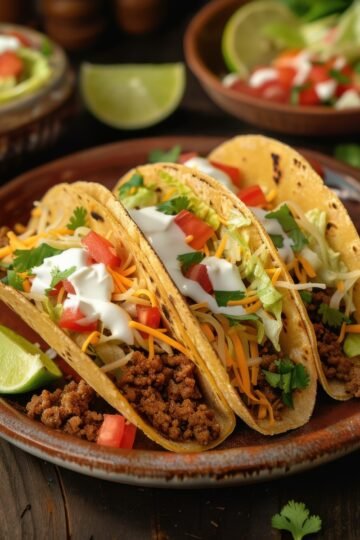
Chili Cheese Fries (Restaurant Style)
Equipment
- Large Sheet Pan
- Parchment Paper
- Small Pot
- Oven-Safe Serving Dish
Ingredients
Fries
- 2 lb Frozen French Fries or fresh-cut
- Avocado Oil spray or drizzle, for baking
Toppings
- 2 cups Hot Dog Chili beanless — see Hot Dog Chili recipe
- 2 cups Shredded Cheese cheddar, Mexican blend, or white American
- ¼ cup Green Onions sliced, optional
- ¼ cup Pickled Jalapeños sliced, optional
- Sour Cream optional
Instructions
Prep and Bake Fries
- Preheat oven to 425°F.
- Line a large sheet pan with parchment paper.
- Spread frozen fries in a single layer and lightly spray or drizzle with oil.
- Bake according to package directions until golden and crispy, typically 20-25 minutes, flipping halfway through.
Heat Chili
- Heat the hot dog chili in a small pot over low heat, stirring occasionally, until warmed through, about 5-7 minutes.
Assemble and Melt
- Increase oven to 450°F.
- Transfer fries to an oven-safe serving dish or keep on the sheet pan.
- Ladle the warm chili generously over the fries.
- Sprinkle shredded cheese over the top.
- Return to oven for 3-5 minutes until the cheese is melted and bubbly.
Serve
- Remove and immediately top with green onions and jalapeños if desired.
- Serve hot with sour cream on the side.
Notes
Why This Assembly Meal Works
Everyone loves chili cheese fries. That's universal truth whether you're at a sports bar, a diner, or standing in your kitchen at 6:45 PM wondering what's for dinner. But here's the problem most restaurants get wrong: they ladle regular chunky chili over fries. Beans compete with potatoes for texture. Everything gets soggy. The chili slides to the bottom of the plate while your fries sit there naked and sad.
The secret to proper chili cheese fries is using beanless hot dog chili-finely ground meat in a clingy sauce that coats every crispy surface instead of competing with it. That texture issue bothered me every time I ordered this dish until I figured out what actually works. You don't want beans fighting with fries for space in your mouth. You want fine-textured protein and sauce that clings and stays with the fries rather than just making them wet and falling to the bottom of the plate like regular chili does.
That's exactly what your Restaurant-Style Taco Meat becomes when it's waiting in your freezer. The texture is already perfect. The seasoning is already dialed in. You're not cooking tonight. You're assembling restaurant-quality comfort food while fries bake. That's the infrastructure working.
The Batch Component Foundation
This assembly meal requires one portion of Restaurant-Style Taco Meat from your freezer. If you haven't made that batch component yet, start there-it's the foundation that makes this 28-minute dinner possible.
The beauty of using this specific batch component is what you've already created: ground beef cooked fine with the right spice balance and sauce consistency to work as authentic hot dog chili. It's not chunky. It's not watery. It clings to fries the way proper chili cheese fries should work. When you made that batch, you created the exact texture that restaurants charge $15 a plate for.
What You're Actually Doing Tonight
You're not browning ground beef. You're not simmering chili. You're not standing over a stove for an hour. You're baking frozen fries while reheating fully-cooked, pre-seasoned meat that's been waiting in your freezer for exactly this moment. The meat is already browned, spiced, and ready. You're literally working a dinner service line-assembling components like a professional kitchen.
If you were making this from scratch right now, you'd spend 20 minutes browning beef, another 30 minutes simmering it into chili, plus dealing with a greasy skillet and splattered stovetop. Instead, you're spending 5 minutes reheating while fries bake. That 50-minute difference is why the batch component changes everything.
Assembly Timeline
From freezer to table in 28 minutes. Here's the honest breakdown of what actually happens tonight when everyone's hungry and you need dinner now.
The Actual Steps
- Start the fries: Spread frozen fries on a sheet pan, slide into a 425°F oven. Set timer for 25-28 minutes. This is your longest task-everything else happens while they bake. Walk away.
- Reheat batch component: Pull one portion (about 2 cups) of Restaurant-Style Taco Meat from freezer. Microwave 3-4 minutes, stirring halfway, or simmer in a small pot with a splash of water for 5 minutes. The meat is already cooked and seasoned-you're just bringing it back to temperature.
- Prep toppings: Shred cheese if you're using block cheddar. Chop scallions. Slice jalapeños if you want heat. Three minutes of knife work, maximum. This is optional-you can skip straight to assembly if you're truly exhausted.
- Assemble and finish: Fries come out crispy and golden. Transfer to serving platter or keep on the sheet pan. Ladle hot taco meat over every surface-it should coat the fries, not pool underneath. Cover with shredded cheese. Back in oven 2-3 minutes until cheese melts. Garnish with whatever you prepped. Serve immediately while everything's hot and the fries are still crispy.
Why This Beats Takeout
- Faster: 28 minutes from decision to dinner versus 35-45 minutes waiting for delivery
- Cheaper: $9 homemade for 4 people versus $38-45 for loaded chili cheese fries at a restaurant
- Better quality: Real shredded cheese, crispy fries straight from your oven, meat you seasoned yourself weeks ago
- No decision fatigue: You've got the batch component. The meal is already decided. Just execute the assembly.
- Perfect texture: Hot dog chili that actually clings to fries instead of that watery bean chili that makes everything soggy
Cost Comparison
Let's run the real numbers on what this comfort food classic actually costs when you're pulling batch components from your freezer inventory instead of ordering delivery or hitting a restaurant.
Real Numbers
- Batch component portion: $3.50 (2 cups Restaurant-Style Taco Meat from your freezer)
- Fresh additions: Frozen fries $2.50, shredded cheese $2.00, scallions and jalapeños $1.00
- Total homemade cost (serves 4): $9.00
- Restaurant equivalent: $38-45 for loaded chili cheese fries for a family of four
- Savings per meal: $29-36 staying in your pocket
Variations & Substitutions
This is the basic template, but chili cheese fries are endlessly customizable. Use what you've got in the freezer and pantry. Make it work for your family.
Make It Your Own
- Different protein: Swap in Batch Pulled Pork for BBQ cheese fries, or use leftover Roasted Chicken Thighs shredded with buffalo sauce for buffalo chicken fries
- Potato options: Tater tots instead of fries, seasoned curly fries for extra flavor, crispy potato wedges if you've got more time, or even waffle fries
- Cheese upgrades: Mix sharp cheddar with pepper jack for heat, use queso blanco for authentic Tex-Mex, or go full stadium-style with cheese sauce
- Toppings bar: Set out sour cream, guacamole, pico de gallo, pickled jalapeños, diced onions, cilantro-let everyone build their own loaded version
- Make it loaded: Add crispy bacon bits, black olives, diced tomatoes, green onions-whatever you'd pile on nachos works here
- Spice adjustment: Keep jalapeños and hot sauce on the side for those who want heat, serve plain for kids who don't
This Is Why You Batch Cook
Three weeks ago, you spent 90 minutes making Restaurant-Style Taco Meat and portioned it into your freezer. Tonight you spent 5 minutes reheating one portion while fries baked. Twenty-eight minutes from hungry family to satisfied dinner with restaurant-quality comfort food that actually works-no soggy fries, no chili sliding off, just properly coated, perfectly textured chili cheese fries that everyone loves. That's the batch cooking infrastructure working exactly as designed.
You're not meal prepping containers of reheated leftovers. You're not eating sad desk lunches. You're stocking a professional kitchen that delivers peak comfort food on demand. The batch component is your mise en place. The assembly meal is your dinner service. This is the system that beats takeout every single time-faster, cheaper, better quality, and with the exact texture that makes chili cheese fries actually work instead of turning into a soggy mess.
Recipe
Chili Cheese Fries (Restaurant Style)
Equipment
- Large Sheet Pan
- Parchment Paper
- Small Pot
- Oven-Safe Serving Dish
Ingredients
Fries
- 2 lb Frozen French Fries or fresh-cut
- Avocado Oil spray or drizzle, for baking
Toppings
- 2 cups Hot Dog Chili beanless - see Hot Dog Chili recipe
- 2 cups Shredded Cheese cheddar, Mexican blend, or white American
- ¼ cup Green Onions sliced, optional
- ¼ cup Pickled Jalapeños sliced, optional
- Sour Cream optional
Instructions
Prep and Bake Fries
- Preheat oven to 425°F.
- Line a large sheet pan with parchment paper.
- Spread frozen fries in a single layer and lightly spray or drizzle with oil.
- Bake according to package directions until golden and crispy, typically 20-25 minutes, flipping halfway through.
Heat Chili
- Heat the hot dog chili in a small pot over low heat, stirring occasionally, until warmed through, about 5-7 minutes.
Assemble and Melt
- Increase oven to 450°F.
- Transfer fries to an oven-safe serving dish or keep on the sheet pan.
- Ladle the warm chili generously over the fries.
- Sprinkle shredded cheese over the top.
- Return to oven for 3-5 minutes until the cheese is melted and bubbly.
Serve
- Remove and immediately top with green onions and jalapeños if desired.
- Serve hot with sour cream on the side.
Was this helpful?
You must be logged in to post a comment.